Showing posts with label Julia Child. Show all posts

Thursday, June 30, 2011

Poached Eggs, Revisited.

The other day I was watching TV and while I was flipping through channels I saw that Julia Child's cooking show was about to come on, so naturally I decided to watch it.

Hilariously enough, it was the episode in which she makes poached eggs, so I attempted to pick up some tips from the master and see if I could make any more sense out of her poached egg nonsense.

Basically, the entire segment was nearly word-for-word out of Mastering the Art of French Cooking. She recommended using that dang poaching spoon again. But she also offered a new technique: The vortex.

The idea behind this method is that you create a vortex in your barely simmering pan of water and the spinning motion keeps the egg intact so it doesn't end up being poached scrambled (see my first attempt at poaching an egg).

Huh...I thought. That sounds like fun to try. And so I did. And I attempted to document simultaneously, which probably led to the ultimate demise of this plan. Nonetheless, here are the results.

Notice how the whites are going everywhere while following the path of the vortex.

So once again, Julia Child fails at teaching me how to properly poach an egg. What's even funnier is that all of the eggs she cooked without the poaching spoon thing ended up about as bad as mine. Perhaps the best part of the segment was when she said (in her boisterous and seemingly drunk voice): "Theeeeeese eggs are nottttttttttt very pretty. They would not be gooooooood enough to serve unless yoooooooooooooooooooou have a lot of saaaaaaaaaaaaaaaaaaaaaaauce on toppppppppppp of them!"

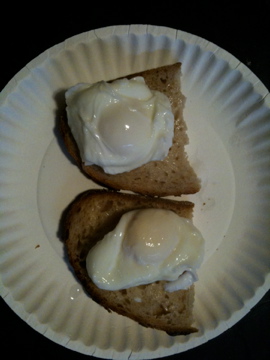
After my failed vortex, I made another egg using my co-worker's method of letting the egg poach itself.

The one on top that looks halfway decent is my co-worker's method. The one underneath with the yolk hanging out is Julia Child's method. You be the judge.

Despite this, I may have to continue trying to catch Julia Child's show. Just so I can have a good laugh.

Thursday, March 24, 2011

Yeast, Hot Cross Buns, Homemade Pizza

I finally got the ingredients together to make my great grandmother's hot cross buns. I had never made anything that used yeast before or anything that needed to rise before I made it, so I was pretty intimidated by this less-than-helpful recipe. Nonetheless, I am never one to let fear stand in the way of my cooking adventures, so I bought a couple yeast packets and went to work.

Lucky for me, my Better Homes and Gardens Cookbook also has a recipe for hot cross buns (p. 157), so I pretty much followed the entire second half of that recipe as a guide for the missing half of my great grandmother's. Interestingly, the Better Homes and Gardens recipe started with "These slightly sweet rolls often are served during the Easter season," which made me realize that they are actually hot CROSS (as in Jesus) buns. More information about traditional hot cross buns can be found here.

Anyway, here is my modified recipe all in one piece:

1 c. scalded milk
1/2 c. sugar
1/4 c. butter
1/3 tsp. salt

Combine above and cool to lukewarm. Mix 1 tsp. sugar with 1 yeast cake, dissolve in 2 Tbsp. warm water. Add to above mixture, then add:

1 beaten egg
1/2 c. raisins
1 tsp. cinnamon
1/4 tsp. allspice
3 1/2 to 4 c. flour

Turn dough out onto a lightly floured surface. Knead in enough remaining flour to make a moderately soft dough (3 to 5 minutes total). Shape into a ball. Place in a lightly greased bowl, turning once to grease surface of dough. Cover; let rise in a warm place until double in size (about 2 hours).

Punch dough down. Turn dough out onto lightly floured surface. Cover; let rest 10 minutes. Meanwhile, lightly grease two baking sheets; set aside. Divide dough into 20 pieces. Gently pull each piece into a ball, tucking edges under to make smooth tops. Place balls 1 1/2 inches apart on prepared baking sheets. Cover; let rise until nearly double in size (about 1 hour).

Preheat oven to 375°F. Using a sharp knife, make crisscross slashes across the top of each dough ball. Brush egg whites over rolls. Bake about 15 minutes or until golden brown. Immediately remove buns from baking sheets. Cool slightly on wire racks.

Tada!

Not gonna lie, this is pretty much what you would get if you made cinnamon raisin bread into buns, but they are delicious (particularly when they're fresh from the oven). Also, yeast is not that bad to work with (other than the smell...). I took the remainder of my batch to work the next morning where they were quickly gobbled up.

But before that, I decided to use my remaining yeast packet to try out Better Homes and Gardens' homemade pizza recipe (p. 150):

2 1/2 to 3 cups all-purpose flour
1 packet active dry yeast
1/2 teaspoon of salt
1 cup warm water (120°F to 130°F)
2 tablespoons olive oil

In a large mixing bowl combine 1 1/4 cups of the flour, the yeast, and salt; add warm water and oil. Beat with an electric mixer on low speed for 30 seconds, scraping bowl. Beat on high speed for 3 minutes. Using a wooden spoon, stir in as much of the remaining flour as you can.

Turn dough out onto a lightly floured surface. Knead in enough remaining flour to make a moderately stiff dough that is smooth and elastic (6 to 8 minutes total). Divide dough in half. Cover; let rest for 10 minutes.

Preheat oven to 425°F. Grease two 12-inch pizza pans or large baking sheets. If desired, sprinkle with cornmeal. On a lightly floured surface, roll each dough half into a 13-inch circle. Transfer dough circles to prepared pans. Build up edges slightly; prick dough with a fork. Do not let rise. Bake about 10 minutes or until light brown. Spread pizza sauce onto hot crusts and top with desired meat (pepperoni), vegetables (skip), and cheese (smoked mozzarella). Bake about 10 minutes more or until bubbly. Cut each pizza into eight wedges. Makes 8 servings (2 wedges). 

NOTE: You can take half the dough and freeze it to use later and just make one pizza.

Now, this recipe was ridiculously easy and I didn't get a picture because I gobbled up that pizza so fast there was none left to photograph. This happened both times I made it. It was that delicious.

Also on the subject of breads, the co-op was having a sale on extra-ripe bananas, so I decided to remake my banana bread. This time, I baked it at 325°F for about 80 minutes and it came out perfectly. So, now we know.

Also, after much thought, I've decided to retire my goal of cooking one thing out of my grandmother's cookbooks each week. The main reason being that upon further inspection, they were not the best cookbook choices for this experiment. The PTA cookbook and my grandmother's handwritten cookbook were almost nothing but desserts, the omelets and crepes book was just omelets and crepes (and all of them had too many weird ingredients), the Pomeranian cookbook was hardly Pomeranian at all, and my Julia Child manual was more a lesson in how to cook than what to cook (and, quite honestly, I seem to do better developing my own style of how to cook than listening to Julia, or anyone else for that matter). Also, I'll be moving for school in the next couple months, so I'll probably have to give the cookbooks back to Grandpa before long anyway.

I think, in the stead of this goal, I'll make a new goal to make one new recipe each week, regardless of its origin. The point of the previous goal was to make healthier food, and I can better make that point if I have more sources available to me.

Monday, March 7, 2011

Animal, Vegetable, Miracle

I finally finished reading Barbara Kingsolver's book, Animal, Vegetable, Miracle this morning. I thoroughly enjoyed it and it brought to my attention a lot of food issues that I hadn't thought of before, but there was one thing that just didn't rub me the right way.

The premise of the book is that Kingsolver and her family decide to eat nothing but local food for an entire year, but they seem to break the rules every chance they get! They start off immediately breaking the rules by allowing for several exceptions right off the bat. They are allowed to eat grains and olive oil based on the simple fact that those things just aren't available locally. Okay, I said to myself, those are kind of necessities and if there's no way to get those locally, it's at least a step in the right direction. Then, on top of that, each family member got one "freebie" food: coffee, dried fruit, hot chocolate, and spices. Alright, I'll let that slide too. In fairness, they were buying those things from farmers who got fair wages and practiced sustainable agriculture, which is also important, and everyone needs a treat now and then.

But then they went on not one, but two multi-week vacations over the course of the year. And yes, they ate local foods from their vacation sites, sometimes, but not always. And they ate at friends' houses who didn't follow their locavore lifestyle and even ate out at restaurants that didn't serve local food on occasion.

Now don't get me wrong. Kingsolver and her family did a much better job of eating local, sustainable, and organic food than I do and probably better than I ever will. They grew a huge garden and raised their own animals and bought plenty of food from local farmers. And the vast majority of their food was local. But the thing here is that this was hardly a change for them. They already ate out of their garden previously and bought lots of food from the farmer's market and made an effort to eat local whenever possible. My point is, how is this any different than what they already did? They stepped it up a notch, but they really didn't go all the way, as the book promised in the beginning.

That being said, Kingsolver did an excellent job of making me appreciate and understand the importance of purchasing local food. I already knew it was important because you put money back into your local economy and it's fresher and all that. But one thing I never really thought about was all of the fossil fuels it takes to get food from all over the world to the grocery store. If we ate locally grown food instead, the fuel cost would be practically non-existent. Even doing something as simple as buying fruits and vegetables at the farmer's market instead of the grocery store would make a huge difference.

One other thing I really liked about the book was the inclusion of so many recipes they used to make locally produced breakfasts, lunches, and dinners. Once spring starts to roll around, I'll have to try to make some of these when the produce is in season.

I also appreciated the alternating format of the book. Most of the story is told through Kingsolver, but her older daughter, Camille, had an essay related to Kingsolver's story at the end of most chapters. And Kingsolver's husband, Steven Hopp, interjected with relevant facts and statistics throughout the narrative as well. The writing is charming, witty, and endearing. I could feel the happiness, worry, pride, and panic in Kingsolver's words, and her passion fueled my desire to eat better. I think the next book I'll work on is Marion Nestle's Food Politics. Michael Pollan referenced this one several times in his works, so it's likely awesome.

On that note, I went to the co-op grocery store today and picked up a few more local items than usual. After I went through nearly two dozen eggs last week, I snatched up a carton of my usual cage-free organic eggs. But just as I was about to walk away, I saw a row of plain egg cartons and all that was stamped on them was the name of the farm and the city where they farmed. My city. Without a second thought, I checked the local eggs for cracks and put back my usual eggs. I also found a brand of cottage cheese made on a farm only 20 miles from where I live, so I grabbed some to make lasagna this week. I also got another whole chicken from a local farm, and I bought bread baked at the co-op rather than baked elsewhere and then shipped to the co-op, so it saved a little gas there.

Also, one of my cooks at work read about my poached egg fiasco and gave me a little pep talk (re: made fun of me). So I watched him poach a couple eggs this weekend, and retried poaching eggs on Saturday afternoon. Here are my results:

Much better!

Basically, my problem was that I was trying to keep all the white intact, when really only the inner whites need to cook with the yolk and the rest just melt away. So pretty much all you have to do is drop the egg in the water and don't touch it til it's done. Sorry Julia, but you made that way more complicated than necessary.

Eggs Benedict with Paprika

Friday, March 4, 2011

Poached Eggs and Hollandaise

For this week's recipe from one of my grandmother's cookbooks, I chose to make poached eggs and hollandaise sauce from Julia Child's Mastering the Art of French Cooking. I made deviled eggs last night, which my husband and I nearly instantaneously devoured, so I was kind of on an egg kick already.

I loved the scene in the film Julie & Julia where Julie attempts to make poached eggs, and I thought there was no way it could be that hard. My cooks at work do it all the time and it never turns out like that soupy mess she made. But I hadn't yet done it myself, so I figured now was the time to learn.

I felt like the poached egg thing was kind of cheating because I already knew the basics on how to poach an egg (just break the egg over boiling water and wait til it's done cooking), and so it wasn't much of a recipe. So, I opted to do two "recipes" this week and finally learn how to make hollandaise sauce as well, because, let's face it, I wanted to learn how to take angels and unicorns and make them into the most delicious elixir known to man.

Surprisingly, Julia's recipe did not call for angels, unicorns, or any other mythical creatures. I chose the blender recipe (p. 81-2), which is actually incredibly simple and still tremendously yummy. Julia claims an 8-year-old child could make it, and I'm fairly certain that's still true. Here is the recipe, it makes about 3/4 cup:

3 egg yolks
2 T. lemon juice
1/4 tsp salt
Pinch of pepper
1 stick butter

Place the egg yolks, lemon juice, and seasonings in the blender jar (or the Magic Bullet).
Cut the butter into pieces and heat it to foaming hot in a small saucepan (or microwave).
Cover the jar and blend the egg yolk mixture at top speed for 2 seconds. Uncover, and still blending (or not, in my case), immediately start pouring on the hot butter in a thin stream of droplets. (You may need to protect yourself with a towel during this operation.) By the time two thirds of the butter has gone in, the sauce will be a thick cream. Omit the milky residue at the bottom of the butter pan. Taste the sauce, and blend in more seasonings if necessary.
(*) If not used immediately, set the jar in tepid, but not warm, water.

Done. 3/4 cup of Heaven ready to go. This recipe is much more lemony than the one we use at work, but it's quite amazing and I have zero complaints. However, since it's on the lemony side, I would not be opposed to halving the amount of lemon and focusing on the delicious buttery goodness.

Next I began to make my poached eggs. Here is Julia's recipe:

Pour 2 inches of water into the pan or skillet and add 1 tablespoon of vinegar per quart of water. Bring to the simmer.
Break one of the eggs, and, holding it as closely over the water as possible, let it fall in. Immediately and gently push the white over the yolk with a wooden spoon for 2 to 3 seconds. Maintain the water at the barest simmer and proceed with the other eggs in the same manner. After 4 minutes, remove the first egg with the skimmer and test with your finger. The white should be set, the yolk still soft to the touch. Place the egg in the cold water; this washes off the vinegar and stops the cooking. Remove the rest of the eggs as they are done, and poach others in the same water if you are dong more.
(*) The eggs may remain for several hours in cold water, or may be drained and refrigerated.

Alright, I said, this seems simple enough. I broke my first egg and, mere centimeters from the water, I dropped it in. I went for the wooden spoon, but it was already too late. The whites had gone everywhere. I tried to keep them together, but it just would not happen. Here is the final result.

I'd like to call this style of egg "Poached Scrambled"

So, that was an utter failure. For the second egg, I ditched the wooden spoon and went for the larger silicon spoon thinking, the only reason Julia didn't use a silicon spoon was because she didn't have one. I decided this time to put the spoon in the water so that it would be immediately ready to rein in the wily whites. I tried to get even closer to the water when I dropped in the second egg, and once again the whites went everywhere. I did manage to keep the egg intact, though, as you can see below.

This one actually looks like it could've been served at the restaurant, but certainly not one of our best.

So Egg #2 was a solid improvement, but I wanted more. This time, I thought, what if I crack the egg into the spoon and then put the spoon and egg in the water simultaneously? Brilliant, I thought. So I set the spoon down on the stove top, cracked open the egg over the spoon and then...

Yeah... that's Egg #3 down there.

The egg managed to slide right off the spoon, through the heat coils and down through the dip pan into limbo. I momentarily panicked not knowing how to get the egg out of there. Will it fall into the oven? Will it just burn up when I use those coils next? What if my stove smells like eggs forever?! Luckily, the drip pan actually comes right off and I could stick my hand and a paper towel down into limbo to snatch it up.

Not to be deterred by this obviously bad idea, I tried it again. This time, however, I realized that there's more in the egg than can fit in the spoon, but I managed to keep it mostly together until it got to the water, where it once again went everywhere.

Egg #4

The end result was better than the poached scrambled monstrosity known as Egg #1, but not nearly as good as Egg #2, in which the yolk was still soft, but I figured I at least had enough egg to make a sort of Eggs Benedict with my creations.

I toasted and buttered a large piece of sourdough bread and topped it with Egg #2 and Egg #4 and then smothered the whole thing in my hollandaise (which I reheated immediately prior). It was phenomenal.

Tada!

I garnished with a little paprika, but forgot to take a picture afterward (actually, I was just really hungry). But as I said, great breakfast and once I master egg poaching, it should be relatively easy to repeat.